The vihuela and guitar crossroads: looking for evidence
The Belchior Dias 1581 Vihuela (notes to the drawing and other observations)*
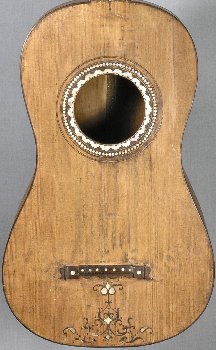
Makers of early guitars and vihuelas around the world are familiar with the Belchior Dias 1581 vihuela**, from the collection of the Royal College of Music (London), not only through its illustrations found in reference books but also through its drawing. This last has been in circulation since 1976 and is still available from the collection. Being the only comprehensive item of documentation for this unique instrument, it is important that the drawing is adequately informative and precise in all the details it purports to convey. However, upon close examination of the original Dias vihuela, it does become obvious that this is not the case.
Listed below are a number of corrections to the drawing, including some features that are totally missing, as well as those that rather inadequately represent the evidence of the original constructional features of the instrument***. Most of the accompanying thoughts and considerations have arisen as a result of preparatory work shortly before making my first replica of the Dias vihuela in June 2004. They also incorporate some recent findings of my ongoing research into the historical aspects of guitar and vihuela construction that appear to be well in line with the original features of the Dias vihuela. I hope this information will be of the benefit to all who have acquired the drawing, either for research purposes or in attempting to reconstruct an accurate replica of this important historical instrument.
* This work would not be possible without generous assistance of the current curator of the RCM collection Jenny Nex. My heartfelt thanks to her!
** This instrument was and is still commonly referred to as a 'guitar', such as in the recently published catalogue of the RCM collection of instruments (see: Elizabeth Wells, Christopher Nobbs: European Stringed Instruments, Royal College of Music, Museum of Instruments, Catalogue Part III, London: Royal College of Music, 2007). Apart from some broad speculations on possible previous owners of the Dias ‘guitar’, the entry on the instrument contains nothing new but a couple of statements which can not be taken seriously from organological point of view – if one is to believe that the authors (and / or their consultants) of the catalogue of such important collection and organisation as the Royal College of Music are knowledgeable in organology.
*** By a way of a disclaimer, the present publication is not in any way intended as criticism of the drawing. Its main and only purpose is in revealing and exploring the evidence to be found in the Dias vihuela. The drawing of such an important historical instrument as the Dias vihuela should really be the result of collaborative work of a team of dedicated professionals. This would allow proper discourse on the instrument’s various features before they are rendered on the drawing, and which would, in turn, greatly minimise the rather subjective approach of one individual.
I. Wood
I saw a kingwood log sawn.
And of all the woods I ever saw
I never saw the grain figure sprawl
Like on that kingwood sawed!"
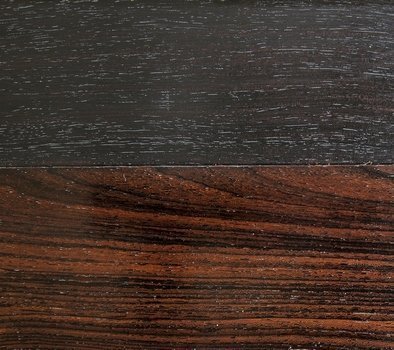
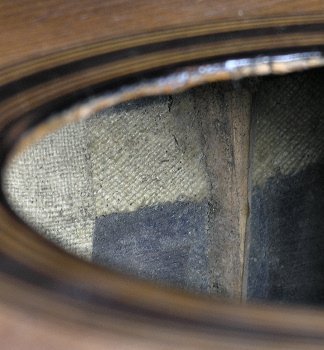
The wood from which the back and sides of the Dias vihuela are made is identified on the drawing as kingwood - supposedly, Brazilian kingwood (dalbergia caerensis). This identification, however, is not correct: the original wood does not even remotely resemble the kingwood, as anyone who has ever seen and / or worked with it can certify. The wood of the neck and peg head is also mistakenly identified as ebony. The remarkable fact is that the actual wood used for virtually all the surviving original parts of the instrument (i.e. the body, neck and peg head, fingerboard and peg head veneers, as well as central lines of triple purflings and spacers) is none other but what is commonly referred to nowadays as African blackwood (dalbergia melanoxylon)!
This
wood is believed to be first introduced to Europe, sometime in the early
16th century, from the coastal area of West Africa (the territory of modern-day
Mozambique) by Portuguese explorers. There are many different names, in
local languages and trades, that were and still being used for this wood:
mpingo, ebony, African ebony, Mozambique ebony, grenadilla, pau / pao preto
etc. Pau preto (literally 'dark wood') is particularly
pertinent to this study: it is this very name that is mentioned in the
first sentence of the Regimento dos Violeiros
1572 as one of the woods of choice for the sides of the vihuela. And
although one can never be sure which exact varieties of wood are behind
the names mentioned in historical sources, the very fact that the Dias
vihuela is made of African blackwood proves to be a valuable testimony
that it was indeed used by 16th century Portuguese vihuela makers.
 |
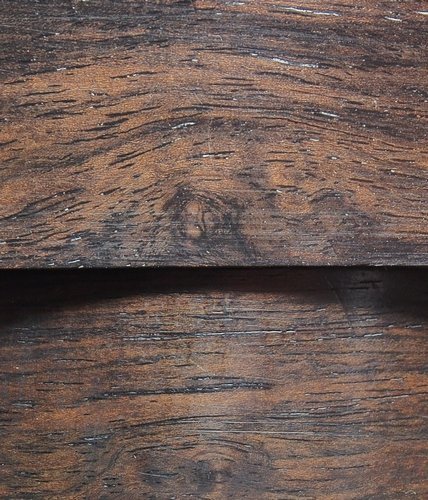 |
Plate 1. Comparison of a present-day sample of African blackwood (top part of pictures) against the sides of the original Dias vihuela shows how remarkably similar the 'new' and 'old' wood (despite of over 400 years of prolonged exposure to the atmosphere!) look like. Click here for the full-resolution image. |
|
 |
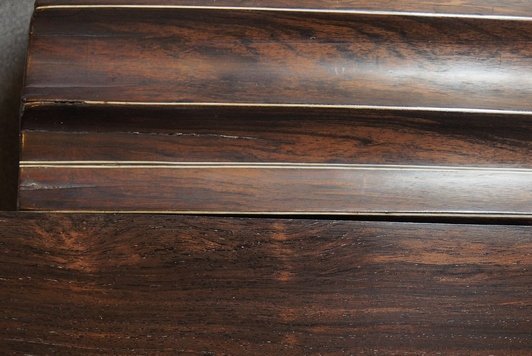 |
Plate 2. A sample piece of African blackwood (same as in Plate1 above)
against the fingerboard and back ribs of the Dias vihuela. Again,
as in case with the sides, the similarity couldn't be more striking. It is very likely that the slices used for the body (sides and fluted back ribs), as well as fingerboard and peghead veneers were cut from the same piece of wood. |
|
 |
 |
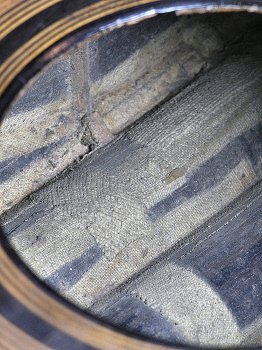
Plate
3. Although
the wood of the neck and peg head appears to be noticeably darker
than
that of the back ribs and sides, there can hardly be any doubt that it is also African blackwood rather than ebony (see also Plate 4 below). |
|
 |
 |
Plate
4. African
blackwood naturally comes in different colour shades: from dark
brown to almost black. The two
samples on the right show some similar degree of colour variation
to that of the sides and neck of the original Dias
vihuela (left picture).
|
|
II. Side and back spacers
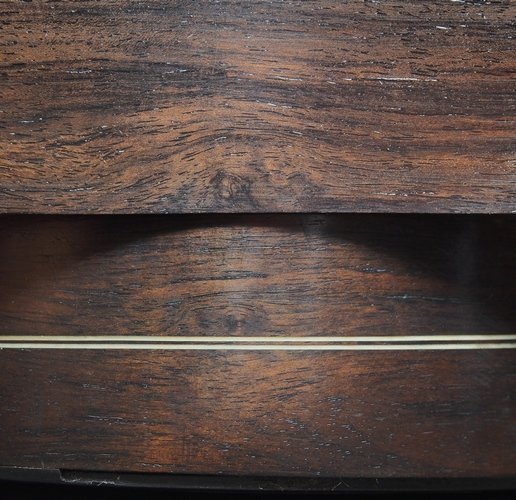
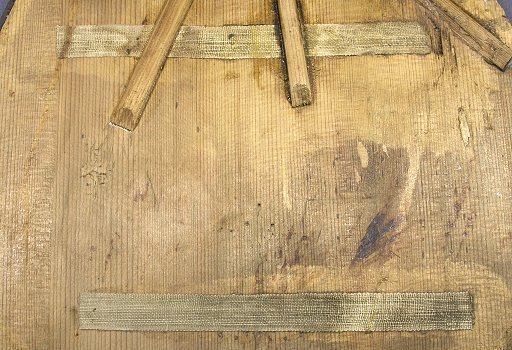
Triple w/b/w contrasting lines in the “valleys” of the three ribs of the back and in the sides of the instrument (see Plates 5) are not set half-depth, as is indicated on the drawing, but are in their full thickness (see Plates 6). So, in fact, they actually serve as spacers rather than purflings, as is indeed common with spacers in the sides and backs of many surviving guitars from the early 17th – mid 18th centuries.
Projected onto a flat template, the spacer in the sides appears in a perfect straight line (the projection is not shown on the drawing). This serves as a further indication that the sides, together with the spacer lines, were assembled first on a flat surface and then bent to shape, in a similar way to the two-piece sides of the ‘Sanguino’ guitar discussed below (see Section II). One can also notice that the three ribs of the back that carry the spacers have (at about one-third stretch of their length) a slight inward tilt of their right and left halves. In other words, in the cross-sectional view of the ribs, there is a tendency to a V-shape, as opposed to a smooth curve. This kind of distortion could have occurred when both halves of the ribs and the middle spacers were all assembled together at a certain point of the back construction procedure. One can only speculate if this was carried out as a separate procedure (i.e. before the ribs were fixed in their corresponding places) or, alternatively, the ribs were built up “in situ” (next to the neighbouring ones) over the internal body mould. There is a noticeable degree of “freedom”, if not to say “inaccuracy”, in the way the middle spacers in back ribs appear on the original Dias vihuela (which, to some extent, could have been caused by the inevitable shrinkage and deformation of the wood during the instrument’s life).
 |
Plate 5. |
Plate
6. A
torch light placed next to one of the rib spacers can be clearly
seen coming through the ivory lines and linen re-enforcement strips
from the
inside of the body. This would not be the case if
the lines had been set in half-depth (as is indicated
on the drawing).
|
|
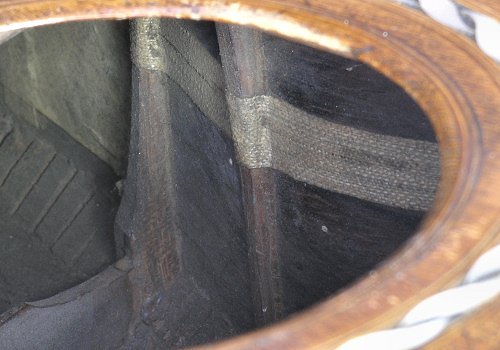
III. Bar end supports
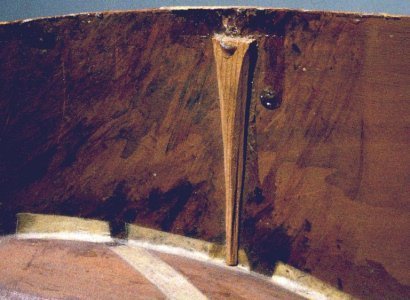
From the inscription on the drawing one gets the impression that the small pine, wedge-shaped blocks glued to the sides of the instrument are located directly underneath the ends of the two soundboard bars (below and above the sound hole), in other words, positioned in alignment with them. The number of these blocks, however, is not specified and their positioning on the side view of the instrument is not shown.
Actually, they are not in any way related to the present unoriginal soundboard and its bars but are, most evidently, the remains (their total number is four) from the original bar end supports and, therefore, indicate the positioning of the bars on the original soundboard (See Plate 7). The upper parts of these blocks, upon which the ends of the original bars were resting, would simply have been cut off when the new, continuous type of lining was added, most probably during the last conversion of the instrument in the late 18th century. The lower pair is at c. 15 mm higher towards the neck of the instrument (from the ends of the present bar, right below the sound hole), while the upper pair is more or less in line with the first bar above the sound hole. Assuming that the sound hole edges of the original soundboard of the Dias vihuela were equidistant, along the centre line of the body, from the bars below and above it (as is the case, for example, with an anonymous vihuela E.0748 from the Paris collection of the Cite de la Musique [see Plate 3, left picture], as well as some surviving 17th century guitars where original bars are still left intact), its relative position on the soundboard would likely to have been c. 4 - 5 mm higher up towards the neck. Also, because of a smaller distance in-between the original bars (by about 15mm), it is plausible to assume that the diameter of the original sound hole was a few millimetres smaller than that of the present conversion soundboard.
All four remaining parts of these original bar end supports appear to be glued directly on top of the linen tape that re-enforces the join of the two halves of the sides from the inside; and so are the small pine blocks along the joining lines of the ribs (see Plate 7, right picture). The sides of the above-mentioned fluted-back vihuela E.0748 from the Paris collection are made of whole strips of wood (i.e. no join or any spacer in the middle) and the bar end supports in this instrument are glued over the parchment strips that re-enforce the join between the sides and the back ribs (see Plate 8, right picture).
 |
 |
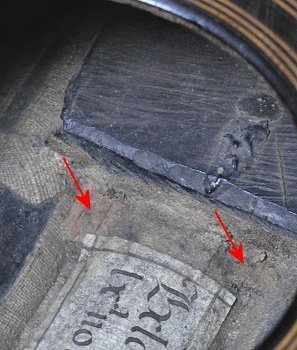 |
Plate
7. Left and middle pictures: middle and lower section
of one of the four remaining original bar end supports of the
Dias vihuela
. Right picture: small pine blocks (shown with red arrows)
are glued over the linen tape that re-enforces the joints in-between
the back
ribs.
Note
also
the maker's label partially covering one of the blocks. |
||
 |
 |
Plate
8. Underside view of the rose and one of the soundboard bar
end supports of an anonymous vihuela Inv. No. E.0748 (Cite de la Musique,
Paris). The shape of the support, with its pronounced tapering towards
the back of the instrument, resembles those found in the Dias vihuela
(see Plate 2, left picture). |
|
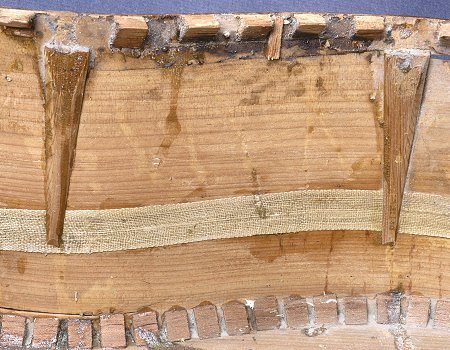
It is quite revealing to observe a very similar picture, with the soundboard bar end supports glued over the linen tape re-enforcement of the joint in the sides, as found on one of the surviving guitars attributed to Francisco Sanguino (c.1760 – 70). In addition, two (of the three) fan-bars on the soundboard of this instrument are also glued over the linen tape, the two strands of which are fixed across the soundboard, in front and behind the bridge (see Plates 9 and 10)*. From the scorch marks that are clearly visible on the inside of the sides of this ‘Sanguino’ guitar it is fairly obvious that the linen strips were applied over the joints after the sides had been bent to shape and, evidently, attached to the back and glued into the slots on both sides of the neck (see Plate 11).
All this evidence serves as a further confirmation to the way the remains of the original bar end supports on the sides of the Dias vihuela are fastened, which would also be fairly consistent if placed in the context of its possible construction procedure:
After the whole body, together with the neck, was assembled and taken off the mould, all the glue joints were secured, from the inside, with linen tape (see Plate 2, middle picture). This would have been followed by the marking out of the exact positioning of the soundboard bar end supports and their subsequent fixation to the sides. The small pine blocks along the joints of the back ribs would also have to be fixed at this stage**. And lastly, the maker’s label was placed just underneath the lower edge of the ‘slipper’ section of the neck block (see Plate 7, right picture).
* We will certainly never know if a similar sort of linen strips were glued to the underside of the original soundboard of the Dias vihuela. This sort of practice, however, seems to have been regarded as obligatory by the Portuguese Regimento dos Violeiros 1572 (i.e. fundo e tampão, e seraa forrada per dentro cõ forros de panno: The back and the soundboard lined from the inside with strips of cloth).
**The technique of using little wooden blocks (pinos) for the re-enforcement of the joints is mentioned in the Regimento dos Violeiros 1572 (i.e. Item mandão que os violeiros que tenda teuerem que fação as violas de seis ordens de duas costilhas: e seião forradas cõ pions ou lenços: Item requiring violeros to make a six-course viola with sides consisting of two strips and re-enforce them [from the inside] with pieces of pine or linen [strips]).
 |
 |
Plate
9. The
appearance of linen tape re-enforcements of the joints in the back and
sides of this guitar (which is attributed to Francisco Sanguino) allows
us to determine exactly at which point of the construction procedure
they were
applied, i. e. just before the soundboard bar rest supports were fixed
to the sides. |
|
 |
 |
 |
| Plate 10. Surviving guitars by Francisco Sanguino show one the earliest forms of fan-bracing. Note also the treatment of the soundboard's underside with a hot iron (a feature seen on many surviving early plucked and bowed instruments) as well as round rosewood dowels, which form part of the soundboard decoration and go through its whole thickness. | ||
 |
 |
Plate
11. Continuous
scorch marks over the whole width of the sides and underneath
the linen strip that re-enforces the joint. The sides of the surviving
guitars by Francisco Sanguino are rather deep and these ones are
made of two pieces of cypress, seemingly for no
other
purpose
than to achieve the required width. |
|
* * *
A rather different picture, however, can be seen on some surviving late 18th – early 19th century guitars of Iberian origin (for example, of such distinguished Cadiz makers as Juan Pages, Josef Pages and Josef Benedit) where linen tape re-enforcement of the middle join in the sides goes over the bar end supports, for both of the back and soundboard bars (see Plate 12). The supports themselves are more complex in shape and incorporate slots into which the ends of the bars are fitted. The holes in the sides are still occasionally found on some (but not all!) of these guitars, apparently as late as well into the first quarter of the 19th century*. Whether some of these makers may have used a somewhat different assembly technique, perhaps including the means of supporting the sides along the soundboard contour with an external mould is, however, difficult to ascertain**. Nevertheless, whichever assembly technique was used, it is clear that all the internal fixtures of the body (linings consisting of separate wooden blocks and bar rest supports for the soundboard and back bars) would have to be completed before the re-enforcement linen (or, in some cases, paper) strips were applied over the joints in the sides.
* One of the surviving guitars by Josef Pages, 1822 that the author of this article came across has two holes in each of the sides, one at the middle bout area and one at the point of the maximum body width.
** There is a belief among some researches that the two back bars may have already been fixed into the bar rest slots before the back was glued on to them and to the sides (i.e. being the final step in the body assembly procedure) and thus keeping the sides in the required shape. It does seem, however, that this was not the case (again judging by the re-inforcement strips over the joints in the back that appear to 'climb' a short distance over the vertical surface of the bars themselves).
 |
Plate
12. Linen tape re-enforcement of the middle joint in the
sides of the Juan Pages, 1803 guitar (collection of Jim Westbrook,
Brighton). |
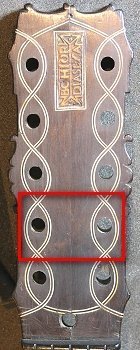
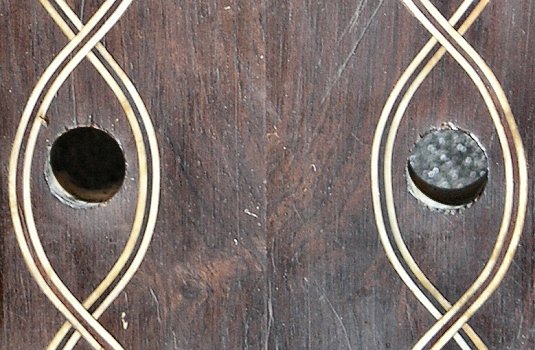
IV. Plugged-in holes in the sides
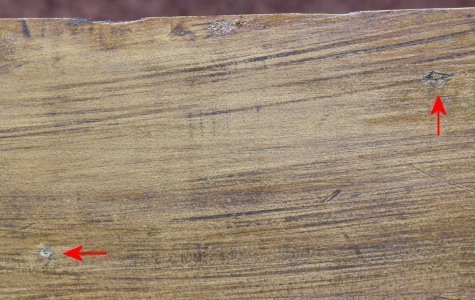
There is a single plugged-in hole in the middle bout area of the sides (it is not shown or mentioned on the drawing), at about mid-distance from the three-line spacer to the soundboard edge (see Plate 13, left picture). Holes of this kind are found present on a number of surviving 17th - 18th century guitars, as well as on the Jaquemart-Andre vihuela*. Most probably they were left from wooden dowels (or nails?) used to support the sides of the instrument during the construction procedure against an internal mould. Here again the similarity with the above-mentioned ‘Sanguino’ guitar is rather striking, with the difference that there are, in fact, two such holes on its both sides (see Plate 8, middle and right pictures)**. It is highly likely that this technique, once adopted by the early 16th century Iberian violeros, was still part of the guitar making tradition well into the second half of the 18th century.
* See: Joël Dugot: Un chef-d’œuvre du XVIe siècle: la vihuela du Musée Jacquemart-André, in Aux origine de la guitare: la vihuela de mano, Cíte de la Musique, Paris 2004, p.55
** One of the surviving (this time labelled) guitars by F.Sanguino from the Hague collection of instruments shows one single plugged-in hole on each side of the body (many thanks to Alex Timmerman for providing detailed photographs showing this feature).
 |
 |
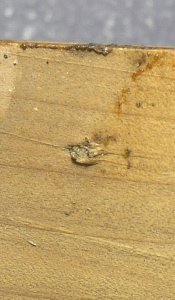 |
Plate
13. Left
picture: Single hole plugged-in
with dowels on each of the sides of the Dias vihuela.
Middle and right pictures: Two holes on each of the sides of
the 'Sanguino' guitar filled-in with wooden dust and glue
(note wood fractures appearing from the inside of the body of
one of the holes). The hole, which is positioned closer
to the edge of the sides (shown with an upward pointing arrow),
may have been necessary to provide an
extra
support, so as
to
keep the sides closer to the internal mould (if indeed this was
used) and thus achieve a more precise control over the
soundboard contour. |
||
V. Fingerboard
A wear mark area on the fingerboard (not indicated on the drawing), at the border with the lower, replaced part of it, shows that there is a light-coloured wood underneath the top ornamented layer (see Plate 9), in other words, pointing to the sliced, two-layer construction of the original fingerboard.
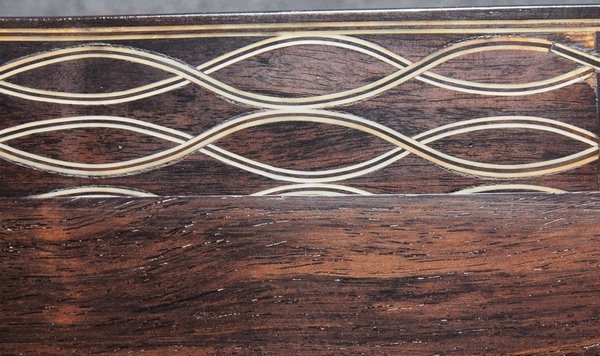
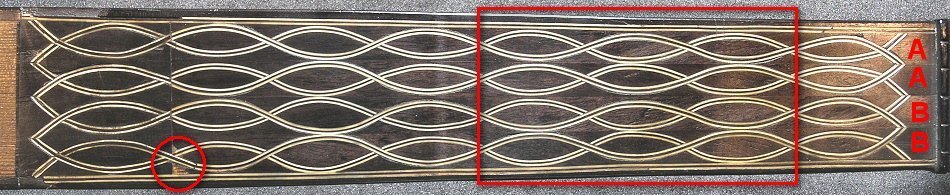
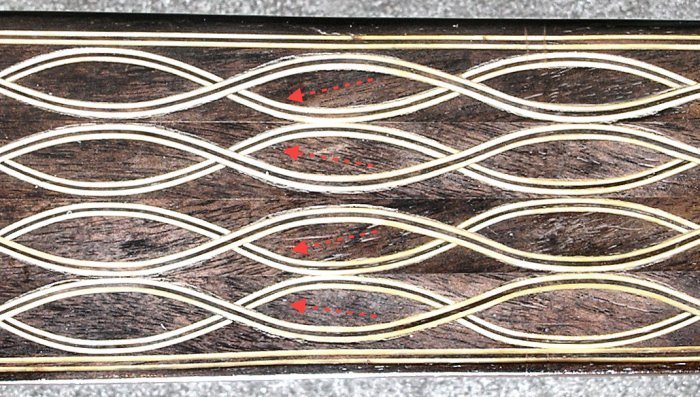
Although the four strips of plait-like intertwining ornaments of the fingerboard are shown on the drawing, their representation is rather inadequate and does not coincide with what they look like on the actual fingerboard. Curiously enough, the peg head patterns are shown symmetrical on the drawing, although again not in exact correspondence in shape with the original. What is really important here, is that the design patterns in both pairs of neighbouring ornamental strips virtually mirror each other, down to small irregularities in widths and lengths in each of the individual ‘loops’ of the design. This book-matched symmetry is also apparent in the direction of wood pores and / or figure on both of the fingerboard and peg head veneers too (see Plates 14, 15 and 16). The importance of such a symmetrical arrangement, together with the above-mentioned sliced, two-layer fingerboard construction, is that it provides a clue as to how those ornamental veneers were originally made: more in the manner of a ‘marquetry’ technique rather than inlaying (as it is described on the drawing, referring both to the fingerboard and peg head patterns). Further confirmation of the use of such a technique (i.e. where symmetrical arrangement of the plait-like patterns is also evident) can be seen on the pre-restoration photographs of an anonymous c.1590 guitar from the former collection of Robert Spencer (see Plate 17)*. There are three ornamental strips, both on the fingerboard and the peg head of this instrument, and here, as in case with the Dias vihuela, the patterns in two neighbouring pairs are in a mirror-like arrangement**.
* This instrument is now in possession of Frank Koonze, USA. The photographs were kindly provided by Martin Bowers who undertook restoration of the guitar in early 1970s.
** It may well be that the maker used already pre-fabricated pairs of such symmetrical strips (perhaps in different widths and lengths) and would chose to arrange them according to each individual requirements, i.e. depending on the fingerboard and / or peg head width. The remaining (non-symmetrical, single strips) could have been used in another instrument.
The fact that there are only two instruments with such ornamental patterns that are known to have survived, leads to an obvious speculation that the c. 1590 guitar could possibly be ascribed to the work of either Belchior Dias himself or the circle of makers closely associated with his workshop. For the time being there is little we can do to further prove or disprove the idea. It may well be that this particular decoration was a rather ‘standard’ feature for a certain category of, say, more richly decorated instruments. There may also be a hint, in the Do Regimento dos Violeiros 1572, that the ability to make such ornaments was part of the examination procedure of the 16th century Portuguese violeros [see footnote (4) of Regimento dos Violeiros 1572].
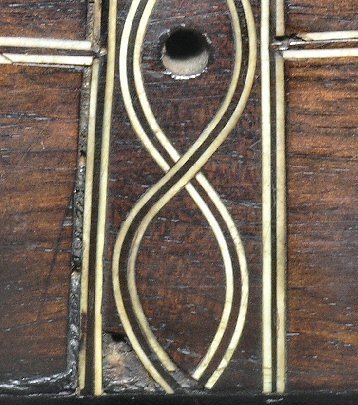
 |
| Plate 14. Encircled: Wear mark area where the upper ornamental layer was scraped off excessively. Rectangle: see for enlargement below. Neighbouring strips AA and BB show clearly symmetrical patterns and were most probably made in pairs of book-matched veneers cut at once. |
 |
Plate
15. Book-matched
arrangement in both pairs of neighbouring fingerboard strips is also
evident in the direction of wood grain . |
 |
 |
Plate
16. Book-matched
peg head veneers of the Dias vihuela. |
|
 |
Plate
17. Neighbouring strips AA and BB on the fingerboard and
peg head of an anonymous c. 1590 guitar, with symmetrical arrangement
of patterns. As is the case with many surviving 17th century guitars,
the neck of this instrument was cut down in length when it was
converted to some kind of 'battente' guitar (most probably
in the late 18th century). The original soundboard
was also substituted during the conversion
to that of an 'angled' type, which is characteristic for such
guitars. It is quite possible that the strip D was cut simultaneously
with
strips
BB
and then
reversed
by 180
degrees. Because of the missing half-length stretch of the original
fingerboard, it is difficult to say if the same is true
for the C
strip. It does, however, appear to closely match in shape the AA
strips and so may well be made simultaneously with them. |
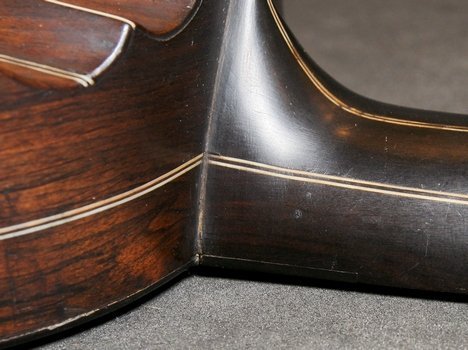
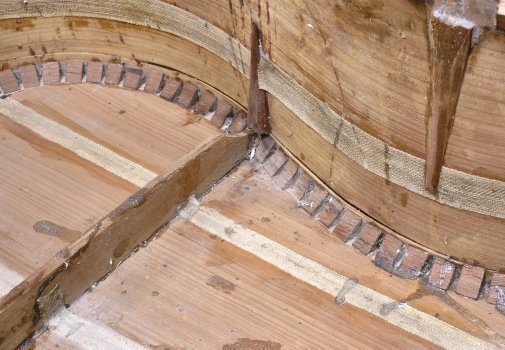
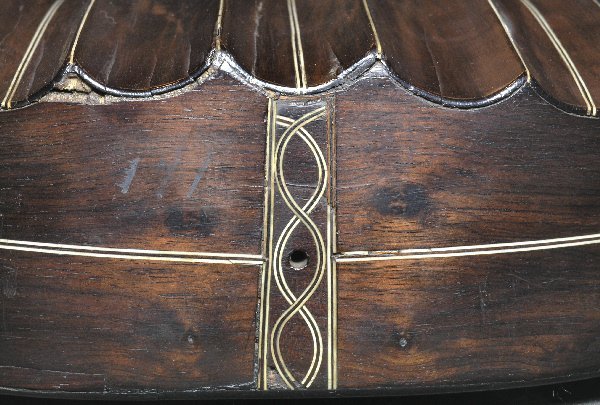
A small section of the plait-like inlay at the meeting point of the sides at the bottom block appears to have been made with a different approach to those of the fingerboard and peg head veneers (see Plate 18). The wood, into which the ornament is set here, has a coinciding grain direction with that of the sides, in other words, perpendicular to the ‘axis’ of the ornament (i.e. not parallel as is the case with the fingerboard strips). The purfling lines end up rather abruptly next to the soundboard edge, while at the opposite end they are arranged more or less in a similar fashion to those on the fingerboard. The idea that this inlay may have been ‘recycled’ from a longer ornamental strip doesn’t seem very likely, especially taking into account the rather unusual wood grain arrangement mentioned above. It looks rather more like a quick ‘improvisation’ of the maker who simply took an off-cut from a wider piece and used it to fill in the space with the matching ornament.
One more detail deserves to be mentioned here: it does seem that there was, what looks more like, an attempt to establish some kind of a mitre joint between the bordering purfling lines of the inlay and the spacers in the sides. Although the whole picture is not entirely clear and partly obscured by later repairs and inevitable shrinkage of wood and glue seams, it appears that the middle lines of the side spacers were once fitted into the V-shaped recesses made in the bordering lines of the inlay, while the outer, ivory lines are just cut off square (see Plate 18, right picture).
 |
 |
| Plate 18. Both pairs of strips from which the sides of the Dias vihuela are made appear to be cut from the same piece of wood, with neighbouring strips arranged at the opposite sides, in a book-matched way. Note a knife mark (left picture) which was probably left by the maker(?) when he trimmed off the side strips. | |
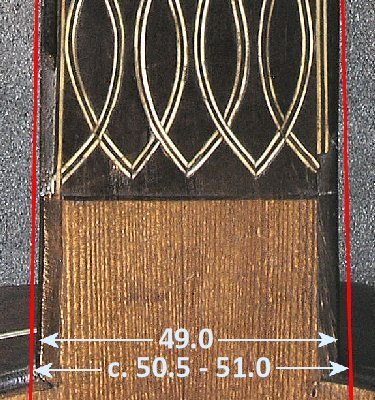
Looking at the side of the fingerboard reveals why the lower part of it was replaced: the fingerboard tapers quite considerably from the nut end to the join with the soundboard extension of the conversion soundboard onto the neck – the result of it being scraped in order to achieve an appropriate clearance of strings above it (most probably during the last conversion of the instrument in the late 18t century). This eventually led to the loss of the original upper ornamental layer of the fingerboard veneer there. Taking into account the original fingerboard’s sliced, two-layer way of construction, it would seem to be logical for it to have a more or less uniform thickness of about 2.3 – 2.5mm (as it is currently now at the nut end) on all its length. The scraping resulted not only in its thinning down at the soundboard end but also in getting narrower there too (bearing in mind that the shape of the fingerboard edges, in their cross-sectional view, would normally follow the shape of the neck). The fact that neck was once wider at its lower end becomes even more apparent in the area above the heel where the upper, extended section of the conversion soundboard was fitted into the recess in the neck, not, as it would normally be, onto its surface (see Plate 19)*. One can clearly see that the edges on both sides of the neck were merely filed down flat in this area. If they were still in their original shape (see Plate 20), the neck would be c. 50.5 - 51.0 mm wide at the join with the body (currently it is about 49.0mm wide). In absolute figures, a wider neck at this point would allow a spacing of the outer strings on the bridge (if this was indeed necessary) at c. 58.0 – 59.0 mm apart**.
*Clearly the rather thin fingerboard end at this point was the main reason for such way of fitting.
** Just as a comparison, this would virtually be equal to a similar distance on the bridge of the six-course guitar by J. Pages 1803 (a much larger instrument, with the string length of 66cm), assuming that the first course is single and positioned in the middle of the first-course pair of strings. For more detailed information on bridge spacing figures see: The Royal College Dias - guitar or vihuela?
 |
 |
| Plate 19. Left and right sides of the heel area of the neck of the Dias vihuela showing file marks, in and above the area where the conversion soundboard extension was slotted into the core of the neck. | |
 |
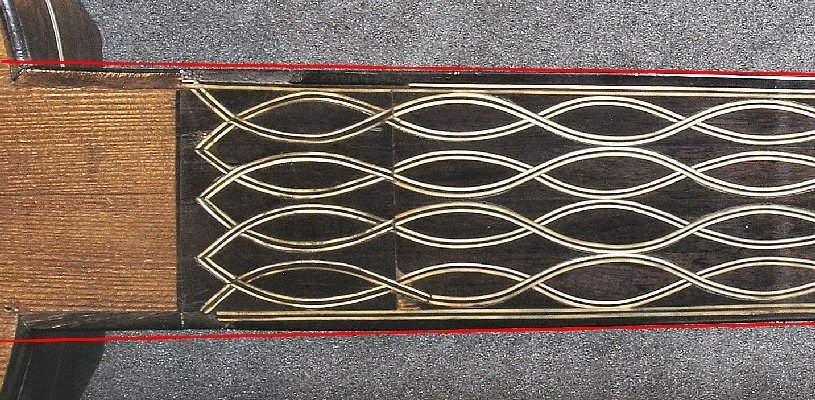 |
| Plate 20. Red lines represent the edges of what would be the original neck width of the Dias vihuela at the join with the body. | |
VI. Soundboard edging
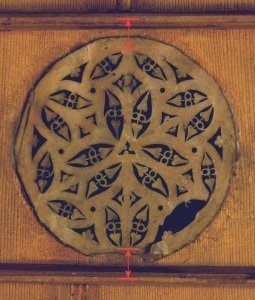
Another pre-restoration photograph of the c.1590 guitar (mentioned in the previous section) reveals what looks like the only remaining part of the original soundboard – the upper part of its extension onto the neck, next to the lower edge of the fingerboard (see Plate 21). It shows two strands of triple w / b / w purflings of which the shallower one matches with the purfling bordering the fingerboard ornament. Bearing in mind the stylistic resemblance of the decorative fingerboard patterns of the two instruments it is reasonable to assume that a somewhat similar purfling motif could have been integrated into the edge of the original soundboard of the Dias vihuela.
 |
Plate
21. |
VII. Neck and peg head
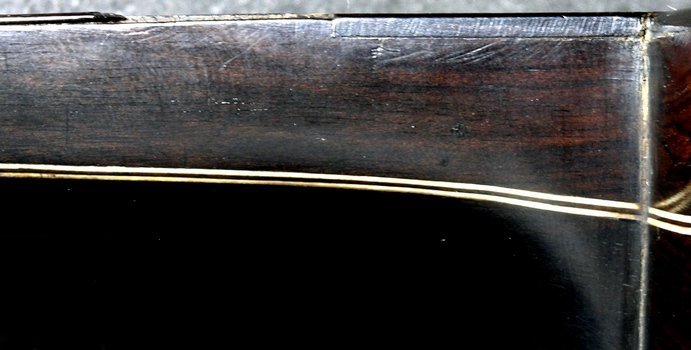
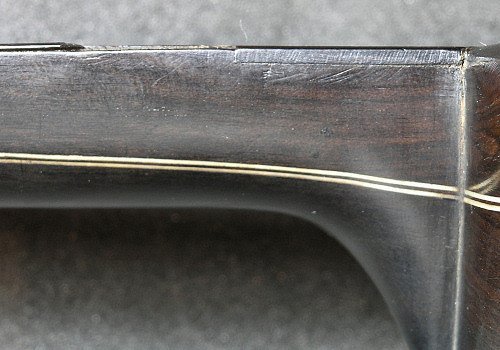
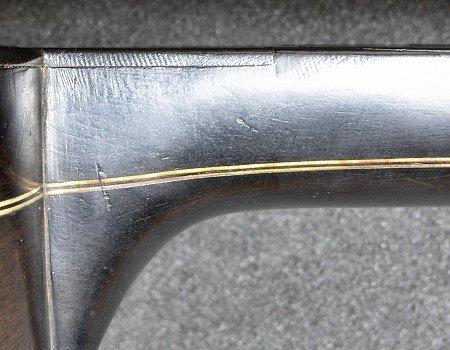
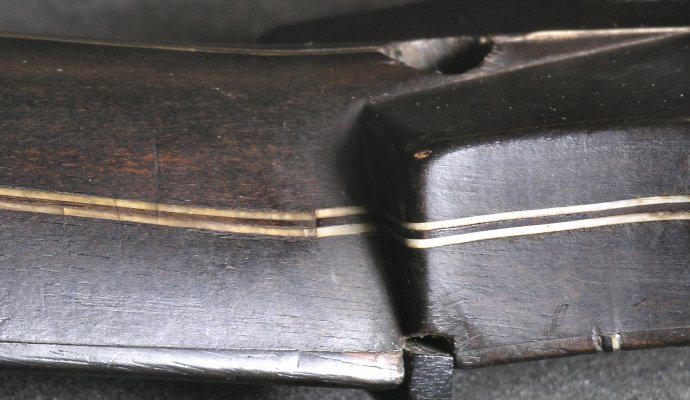
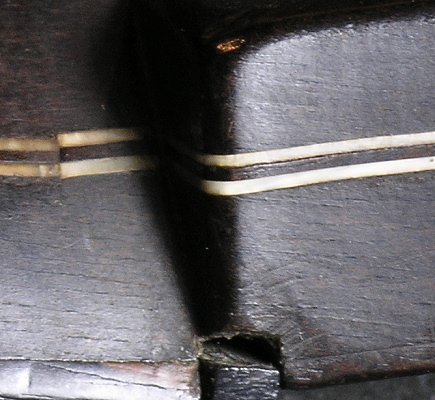
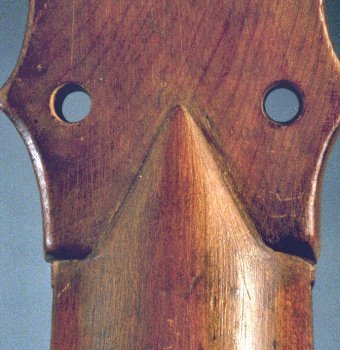
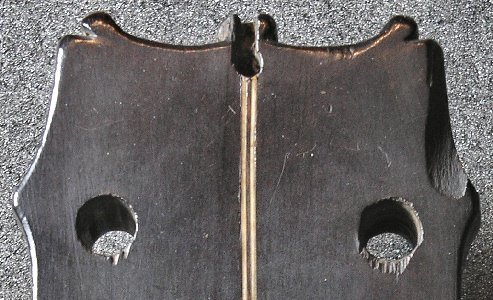
As it is indicated on the drawing, there is a ‘visible joint of pegbox to neck’ (which looks like a V-join extending a short distance into the neck). As a matter of fact, there is no such join! Both the neck and the peg head appear to be made from a single piece of African blackwood, in a similar way to the anonymous fluted-back vihuela E.0748 from the collection of the Cite de la Musique (see plate 24). The three sandwich-like veneers, emerging as contrasting w / b / w lines around the entire peg head perimeter, were most evidently inserted into the continuous saw cut made along the length of the peg head, and into a short stretch of the neck, to join with the matching purfling lines on its both sides (see plates 22, 23 and 25). One can also notice that the cut was made with a noticeable shift towards the rear side of the peg head, seemingly for no other reason than to make the “meeting” point with the neck purflings further away from the edges of the neck, so that they look more or less equidistant from the central purfling along the whole stretch of the neck.
 |
 |
| Plate 22. Note continuity in the direction of wood pores that carries over from neck to peg head. The overall width of the veneers inserted into the peg head appear to be slightly larger than that of the neck purflings. It certainly seems feasible that the veneers were inserted first, thus establishing the 'meeting point' with the neck purflings on both sides of the neck. | |
| Plate 23. The inserted veneers (two of ivory and one of African blackwood) are clearly seen through the central peg hole. |
 |
 |
| Plate 24. Single piece cypress neck and peg head of the anonymous vihuela E.0748 from the Cite de la Musique, Paris. | |
 |
 |
| Plate 25. Side views of the peg head of the Dias vihuela reveal the degree of deviation in side projection of the inserted veneers from a straight line. This can be the result of a number of factors: the initial saw cut was made not in a straight line, distortion across the grain of the peg head width after the veneers were inserted and the glue has set in. It certainly seems feasible that the final shaping of the peg head was carried out after the middle veneers were already in place and, perhaps, the peg head top ornamental veneer was glued on too. |
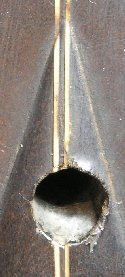
VIII. Strap button hole
A small conical hole (not shown on the drawing) near the top edge and at the centre line of the peg head seems to have been provided for a strap button (which is now lost). It goes through the whole thickness of the peg head (see Plate 26). The use of a strap, to counter-balance the rather heavy, solid African blackwood neck and peg head, would almost certainly make the holding of the instrument more comfortable.
 |
| Plate 26. Small breakages along the lower edges of peg holes serve as a further indication that the grain direction in the peg head runs parallel to that of the neck (see also Plate 16). |
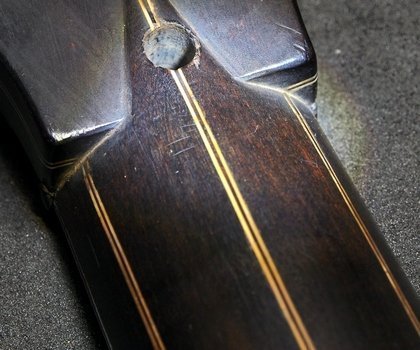
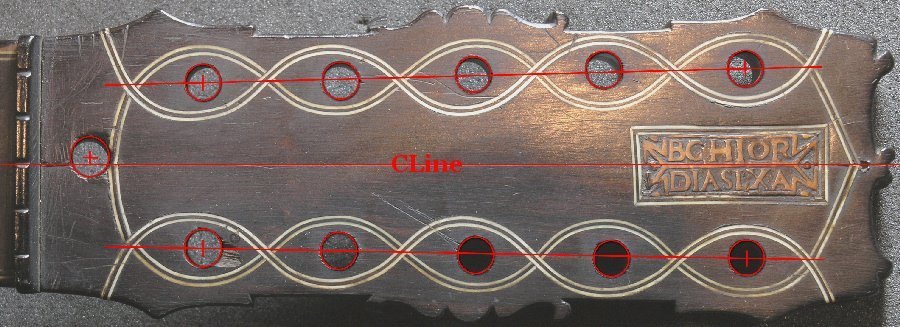
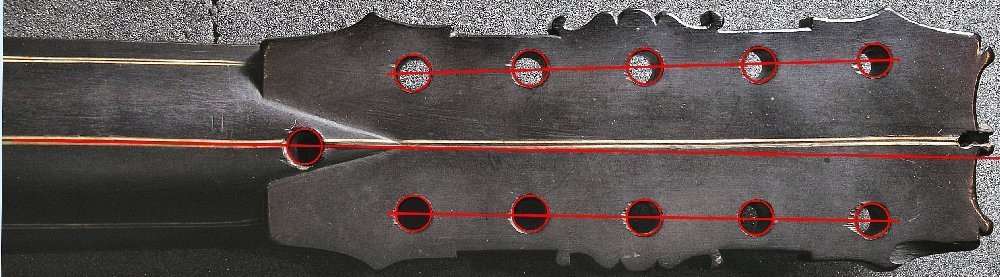
IX. Central peg hole
The central peg hole appears to be noticeably shifted to the left (bass) side of the peg head (See Plate 27)*. It is certainly difficult, if not to say impossible, to find the exact reason why the hole is so misplaced. It may simply be a matter of general “imprecision” in maker’s approach to the constructional process that is well noticeable on other parts of the instrument. It should be noted, however, that drilling a pilot hole in this particular part of the instrument is a rather challenging operation in its own right, bearing in mind the thickness and density of the neck material at this place, together with taking control of the hole’s relative position with the purfling lines on top of the peg head and at the rear of the neck. This also begs a number of questions, such as at what particular point in the construction procedure the hole was drilled (i.e. either before or after the peg head ornamental veneer was fixed in place) and / or what were the reference lines the maker relied upon for marking out its position etc. All these factors could have had their impact, to a larger or lesser degree, on the final outcome.
* On the drawing it is shown, rather incorrectly, exactly on the geometric centre line of the instrument.
 |
 |
| Plate 27. It should be noted that the present, not original, pegs (see Plate 21) most probably originate from the late 18th century (the instrument's last conversion into a 5-course guitar) and are, very likely, of a larger size than the original pegs would be; so all the holes were re-rimmed accordingly and hence the signs of breakages next to their edges from both sides of the peg head (see also Plate 19). A smaller concentric circle (right picture) represents of what would likely be the original peg diameter. | |
Looking at the rear side of the neck reveals a noticeable sway in the direction of the central purfling as it approaches the V-shaped part at the join with the peg head. It does not follow in a straight line as it carries over further onto the peg head – the result of apparent misalignment of the geometric centre lines of the neck and the peg head. At the same time, the positioning of the central peg hole only slightly deviates from what would be a straight line direction of the purfling running along the apex of the neck (see plate 28). So it may well be that the maker used this line as a reference for the placement of the central peg hole which would inevitably bring it off-centre on the peg head plan (assuming that it was drilled perpendicular to its surface). It is logical to assume that the purfling channel (in its entire stretch, over the neck and peg head length) would have been made after the hole was already drilled through the neck. The direction of the purfling channel would then have to be corrected in order to ‘reconcile’ the above-mentioned misalignment of the neck and peg head geometric centre lines. This may also explain why the purfling goes not exactly through the tip of the V-shaped part of the peg head but slightly to the left side of it (see plate 28, right picture).
 |
 |
| Plate 28. | |
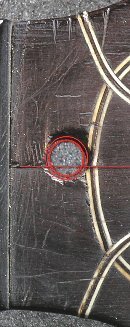
The axis of the central peg is tilted backwards from the rest of the pegs (see Plate 29). It is impossible to ascertain if the tilting was intentional but it certainly seems like a good compromise solution in the rather 'crowded' environment of neighbouring pegs and provides added efficiency when it comes to turning the peg.
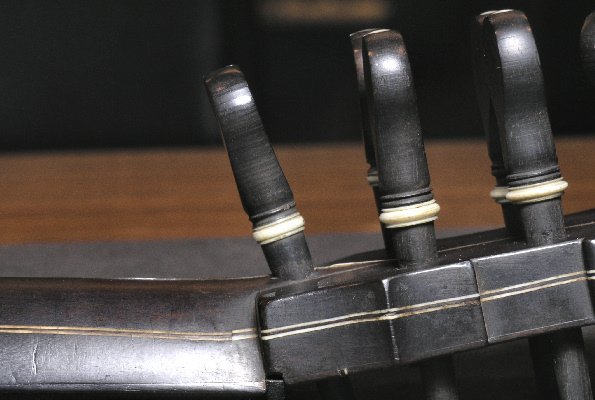 |
| Plate 29. |
* * *
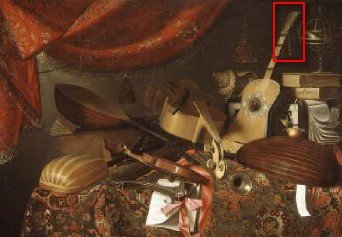
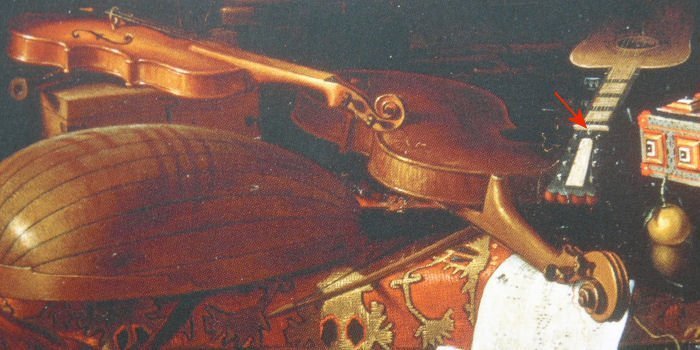
It is worth mentioning at this point that there is some interesting iconographic evidence that seems to suggest a fair amount of deliberation in the positioning of pegs, i.e. single pegs that are placed neither at the centre of the peg head nor in line with the other pegs on either side of it. The two still life paintings by Bartolomeo Bettera depict a ghitarra spagnuola (see Plate 30) and chitarra italiana (see Plate 31), in both cases having one of the pegs positioned just behind the nut and shifted sideways from the centre of the peg head*. One can only speculate if such peg positioning was in pursue of some functional purpose, such as in limiting the length of the string on the stretch between the nut and the peg** and / or putting the peg more in line with the corresponding string direction.
* The depicted instruments do not seem to be unique to these two paintings and appear on a few others, both by Bartolomeo Bettera and his contemporary Evaristo Baschenis.
** The practice of tying strings in bundles, which is seen of a good number of paintings, may well be an indication of the practice of re-using partially damaged strings.
 |
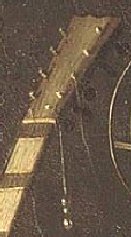 |
| Plate 30. Bartolomeo Bettera (1639-1699), Still Life with Musical Instruments (MFAH): 5-course ghitarra spagnuola. | |
 |
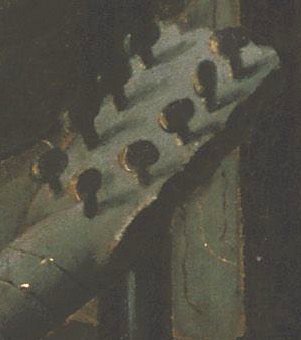 |
| Plate 31. Bartolomeo Bettera (1639-1699), Still Life with Musical Instruments (FAMSF): 5-course chitarra italiana (chitarra a nove corde). | |
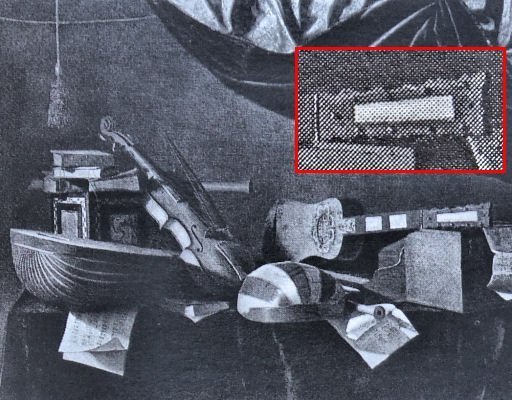
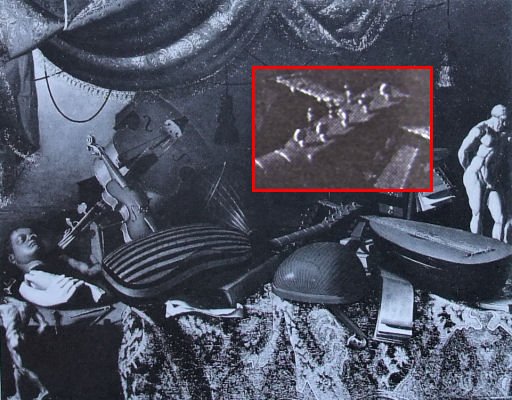
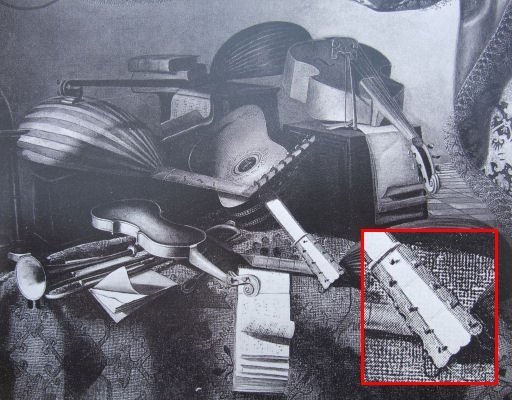
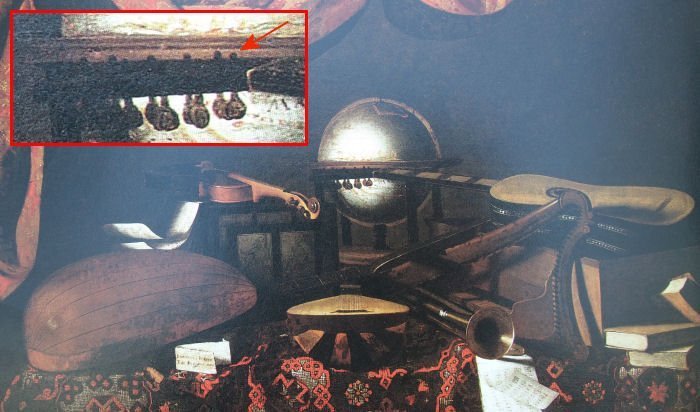
A number of paintings by Bartolomeo Bettera show a single central peg which is positioned right behind the nut, in a similar way as is found on the Dias vihuela. Below are some of the examples taken from reproductions of his paintings that can be found in books published over the last few decades. Despite of the rather poor quality of the illustrations (which are, in most cases, reproduced in black and white) it is still possible to distinguish some finer details and even identify the same instruments (guitars) and various other items that re-appear in other paintings by Bettera.
 |
 |
 |
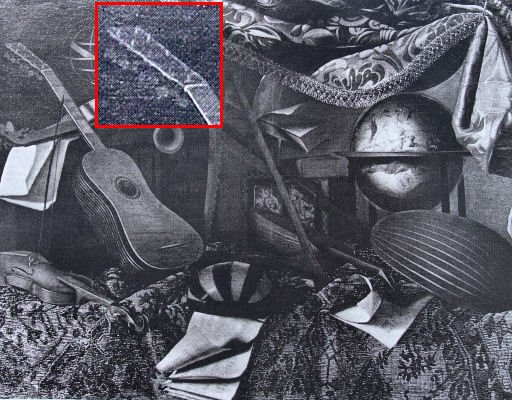 |
Plate 32. Bartolomeo Bettera (1639-1699). Clockwise from upper left picture*: 1 & 2. Private collection (Bergamo); 3. Art merchant (Rome); 4. Brandt gallery (New York). * The locations here are given according to the books from which the illustrations are taken. It is worth to have in mind though that some of the paintings may have changed hands and / or collections since the time of the publication. |
|
 |
 |
| Plate 33. Bartolomeo Bettera (1639-1699). From above: Galleria degli Uffizi (Frorence); Palazzo Pisani Moretta (Venice). These two paintings seem to depict the same guitar; in both cases the single central peg (shown with red arrows) can be clearly distinguished. |
* * *
© Alexander Batov 2008 - 2017
This page was first created on 9 September 2008
Last updated 05 Februaty 2017